Nowadays, smart homes and smart devices are hooked and work through the internet like Shark vacuums. Likewise, these cleaning gadgets are easy to use after logging in and setting up. In addition, you can configure the Shark vacuum through the app generally, but have you ever heard of the Shark vacuum configuration through the Firewall?
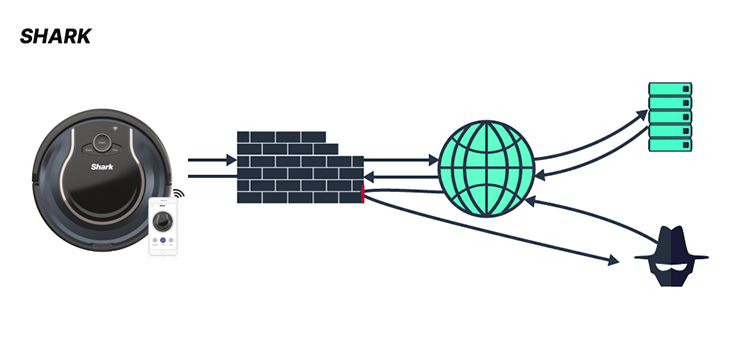
If not, then we will explain you. Generally, a Firewall is one of the innovative technologies we see every day. It filters the traffic and differentiates the network nodes from external, internal traffic sources as well as from specific apps. Additionally, it is a barrier between the secured internal networks and the outside internet.
Moving back to the point, configuring a Shark vacuum using a Firewall is a somewhat complex procedure but not difficult. So, you must follow the steps carefully and do not miss any of them. Here, in this blog post, we will discuss the complete procedure for the easy Shark vacuum configuration through the Firewall. Let’s have a look.
Requirements for the setup
- Shark Vacuum
- Stable and active internet connection
- Admin login details
- Web or IP address
Setting Up the Shark Vacuum Through the Firewall
As discussed above, the Firewall should be used to allow and disallow internet traffic to your smart home gadgets. Besides this, sometimes your Shark vacuum is not connected to the Wi-Fi but not to the internet. Here, we need to enable the Firewall configuration for the Shark vacuum.
Further, for seamless robotic vacuum performance and app communication, a Firewall is a must. So, we share the necessary steps here to ease the process of Shark vacuum configuration through the Firewall. Let’s begin from scratch:
- Initially, ensure your smartphone has a stable network connection and is connected to your WiFi.
- Next, open the web browser and type the default IP or web address of the router here.
- After accessing the login page, look for the Firewall or Port Forwarding section.
- Hereon, you need to add a new port forwarding rule for the ports and protocols you spotted earlier.
- You can find the ports in the user manual or on the official website of your router.
- Keep in mind that opening the required ports only to avoid potential cyber threats.
- For the port forwarding rule to always apply to the accurate device, you need to assign a Static IP to your Shark vacuum.
- Now, save the changes you made in your router settings and click on Apply or OK.
- If the Firewall software runs on your PC or laptop, then ensure it permits communication between the Shark Vacuum and the Shark Clean app.
- Finally, check that the robot vacuum and WiFi connect properly and all the functions work smoothly.
Troubleshooting tips to fix the Shark vacuum Firewall configuration issues
While you are performing this operation, there may be errors that occur due to the lack of internet or if the user does improper configuration. So, the errors are common like login denial, no internet, IP blockage, etc. Therefore, to resolve these issues, we will share a few of the essential troubleshooting steps with you. Let’s have a look:
Place the device and router nearer
- When the router and device are at a farther distance, network errors occur.
- Hence, you are unable to configure your router through Firewall.
- Therefore, you need to relocate your router and place it close to the smart device.
Check the Port configuration
- Verify the ports you open during the Firewall configuration.
- Standard ports are needed to be opened to carry on the setup.
- Due to the Firewall enabled, non-standard ports are blocked sometimes in SNMP devices.
- So, make sure you are using standard ports.
Ensure the IP address is not blocked
- Sometimes the Firewall blocks the device or manager IP address.
- So, cross-check that the IP addresses are not blocked.
Reboot the router
- The common network issues are resolved by rebooting your router.
- So, plug out the router, smart device, and then modem.
- Wait for 30 seconds and then reconnect them.
Reset the router
- When nothing works to fix the Firewall configuration issues, factory reset the router.
- Hence, look for the reset button on your router.
- Press and hold it for a few seconds and then release.
- Wait till the router gets rebooted and powered on again.
- Finally, the reset process is completed and you have to reconfigure it.
On the whole
Last but not least, the information we share with you surely assist you with Shark vacuum configuration through the Firewall process. Additionally, it is a safe process to use your network and connect devices. Further, if you get stuck somewhere then walk through our troubleshooting methods. Still need further assistance? We are a text away!